

Studio Friendly Neck Tattoo Numbing for Clients
Numbing cream can make sense for a neck tattoo, but only with your artist’s sign-off and a patch test done days in advance. Skip it if your studio has a no-numbing policy, since stencil adhesion and ink saturation matter more than short-term comfort. Focus on solid preparation first, and treat numbing as a supplement to that plan, not a replacement for it.
TL;DR:
- Numbing cream can reduce neck tattoo pain but may alter skin texture, interfere with stencil adhesion, and cause unpredictable ink settling.
- Patch testing at least 24 to 48 hours before the appointment is essential to check for skin reactions and ensure safety.
- The typical numbing effect lasts around 60 to 120 minutes, so longer sessions may outlast the cream’s efficacy and require strategic application.
- Proper preparation, including adequate sleep, hydration, and stress reduction, effectively minimizes discomfort without risking ink quality.
- Using numbing cream should always involve clear communication and approval from your artist to avoid complications and maintain the quality of the tattoo.
Table of Contents
- Why Numbing Can Help (and Why Artists Push Back)
- What Are the Real Risks of Numbing Cream?
- How Does Tattoo Numbing Cream Actually Work?
- How Do You Apply Numbing Cream Safely for a Neck Tattoo?
- What Reduces Neck Tattoo Pain Without Numbing Cream?
- How Should You Sleep After a Neck Tattoo?
- What Makes a Numbing Product Studio-Friendly?
- Our Take: Comfort Should Never Outrank the Artist’s Craft
- Which TBNC Products Fit a Neck Tattoo Session?
- Sources
- FAQ
Why Numbing Can Help (and Why Artists Push Back)
The neck is one of the more punishing spots on the body to get tattooed. Thin skin, dense nerve clusters, and proximity to bone all combine to make it rate consistently high on pain scales, especially near the throat or spine. A numbing cream that dulls surface sensation can take the edge off those sharp, stinging passes and help you sit still through a longer line-work session.
That comfort comes with trade-offs artists talk about constantly. Multiple studio-published guides report that numbing creams can alter skin texture, interfere with stencil adhesion, and affect how evenly ink settles into the skin. Numbed skin sometimes swells slightly or feels rubbery under the needle, which changes how the artist reads your reactions in real time. Some artists say they lean harder or move faster on numbed clients because they’re not getting the usual pain feedback that tells them when to ease up.
Here’s the honest breakdown:
- The upside: less flinching, calmer breathing, better tolerance for a two-hour-plus session on a sensitive placement.
- The downside: possible uneven ink uptake, stencil that won’t stick if cream residue remains, and a false sense of security that leads to overbooking session length.
- The wildcard: every artist has a different threshold. Some studios ban numbing outright; others allow it if you follow their exact protocol.
Realism and fine-line artists tend to be the most cautious. One artist writing about why numbing cream complicates realism work notes that numbed skin behaves unpredictably under fine needle passes, making delicate shading harder to control. That’s not a universal rule, but it’s a real concern worth raising with your artist before you book.
What Are the Real Risks of Numbing Cream?
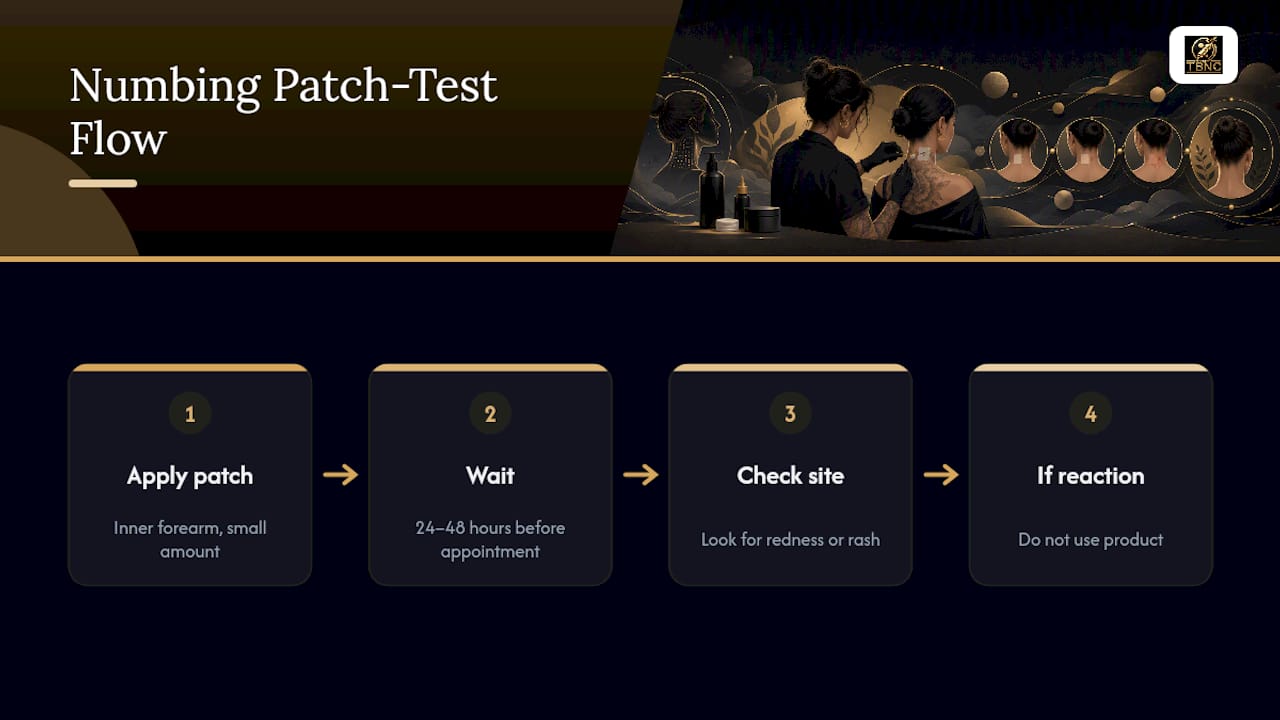
Skin reactions are the most common problem, and they’re also the most preventable. A patch test on your inner forearm, done at least 24 to 48 hours before your appointment, tells you whether your skin tolerates the formula before you’re sitting in a chair with a fresh stencil on your neck. Redness, itching, swelling, or a rash at the test site means that product is off the table.
Medical literature is direct about the bigger caution here: topical anesthetics carry real safety concerns when applied over large areas or without medical supervision. Lidocaine-family creams absorb through skin, and applying too much over too wide an area can push more anesthetic into your system than intended. The neck’s proximity to major blood vessels makes this a spot where following label instructions matters more than it might on a forearm or calf.
Roughly 60 to 120 minutes is the realistic numbing window most artist-authored guides report before sensation starts returning. That’s the number that catches people off guard.
Vasoconstriction is the other issue worth knowing about. Some numbing formulas tighten blood vessels near the surface, which can change bleeding patterns during the tattoo. Artists rely on a certain amount of bleeding and skin response to gauge depth and healing later, so a formula that suppresses that feedback can complicate their read on the work.
Then there’s the wearing-off problem itself. If your session runs long and the cream fades at minute 90, you’re suddenly facing full sensation on skin that’s already been worked for over an hour, often with the hardest lines still ahead. That’s a harder pain spike than starting the session with no numbing at all, because your body hasn’t had time to adjust gradually.
How Does Tattoo Numbing Cream Actually Work?
Most numbing creams for tattoos rely on lidocaine or a related amine anesthetic, sometimes paired with a secondary agent like tetracaine or benzocaine for a deeper effect. These compounds work by blocking sodium channels in nerve endings near the skin’s surface, which temporarily interrupts the pain signal before it reaches your brain.
Onset and duration are where expectations often go wrong. Here’s what the timeline actually looks like:
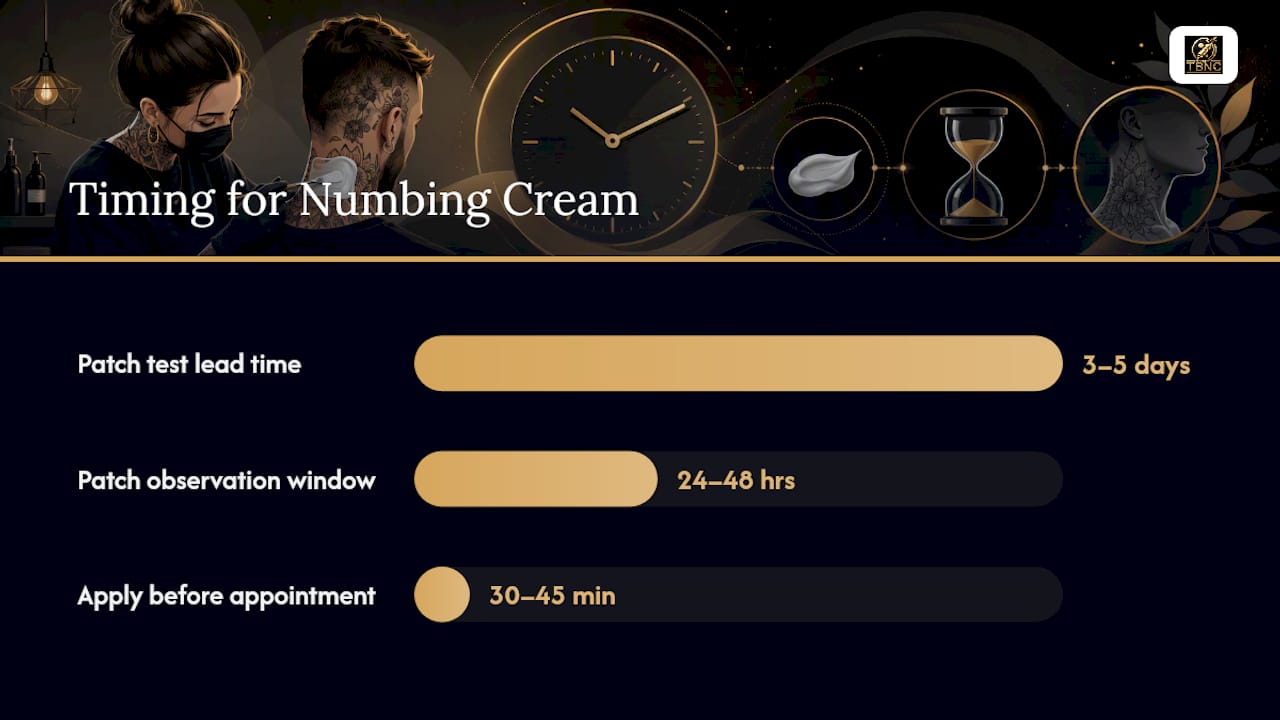
- Onset: most creams need 30 to 45 minutes under occlusion (plastic wrap or a bandage) before they reach full effect.
- Peak numbness: typically hits in the first 30 to 60 minutes after removal.
- Fade window: artist-reported experience puts the drop-off around the 60 to 120 minute mark, though it varies by formula, skin thickness, and how much was applied.
That fade window is exactly why numbing gets complicated on a neck tattoo. A small wrist piece might wrap up before the cream even starts to fade. A detailed neck design that runs two, three, or four hours will almost certainly outlast a single application. Some artists handle this by using a secondary numbing spray mid-session on the worked skin, applied only with their approval and typically on areas that are already broken by the needle. That’s a call your artist makes, not something you should freelance on your own.
How Do You Apply Numbing Cream Safely for a Neck Tattoo?
Getting this right takes coordination with your artist well before appointment day, not a last-minute decision in the studio parking lot.
- Patch test at least 3 to 5 days out. Apply a small amount to your inner arm, wait 24 to 48 hours, and check for redness, swelling, or itching before moving forward.
- Confirm your studio’s policy first. Studio guidance consistently recommends discussing anesthetic use in advance rather than showing up with cream already applied.
- Apply per the product’s directions, usually a thick layer under plastic wrap, 30 to 45 minutes before your appointment.
- Remove the cream completely before stencil placement. Residue is the number one reason stencils fail to adhere.
- Tell your artist exactly what you used — product name, how long it was on, and whether you noticed any reaction.
Pro Tip: Bring the product’s packaging to your appointment. If your artist has questions about the active ingredient or concentration, having it on hand answers them faster than trying to recall it from memory.
If the cream wears off mid-session, say so immediately rather than gritting through it. A short break to reassess is far better than pushing through a pain spike that makes you tense up and shift position, which can throw off line consistency. Following a clear set of numbing cream directions before you ever sit down removes most of this guesswork.
What Reduces Neck Tattoo Pain Without Numbing Cream?
Preparation does more heavy lifting than most people expect, and it carries zero risk to ink quality.
- Sleep a full night beforehand. Fatigue lowers pain tolerance measurably.
- Hydrate for 24 hours prior. Well-hydrated skin tends to handle needle work with less irritation.
- Eat a protein-rich meal 1 to 3 hours before your appointment, and skip alcohol and blood thinners in the days leading up to the session.
- Practice slow, controlled breathing. Tension in the neck and shoulders amplifies pain signals; deliberate exhales during the sharpest passes genuinely help.
- Ask about staged sessions. Breaking a large neck piece into two or three shorter sittings, rather than one marathon session, keeps pain manageable without any product involved.
None of these interfere with stencil adhesion or ink saturation, which is exactly why most artists prefer them over topical anesthetics. For a deeper look at technique-based options, tattoo pain relief methods that don’t involve a cream at all are worth reading before your appointment.
How Should You Sleep After a Neck Tattoo?
Healing a neck tattoo comes down to protecting fresh ink from friction, folding, and fabric while you sleep, since you can’t exactly avoid moving your neck for two weeks.
- Sleep on your side if the piece is on the back of your neck, and on your back if it’s on the front or side, using fresh, clean linens changed more frequently than usual.
- Consider a travel neck pillow. It limits folding and keeps fabric from rubbing directly against healing skin.
- Skip rigid collars or turtlenecks until the piece has fully closed over, typically two to three weeks.
- Keep the area clean and lightly moisturized, avoiding thick ointments that trap moisture against the skin.
- Watch for spreading redness, warmth, or discharge. Normal healing means mild redness for a few days; anything worsening after day four warrants a call to your artist or a doctor.
What Makes a Numbing Product Studio-Friendly?
TBNC Tattoo builds its numbing line around a lidocaine formula designed to last longer and reach deeper than typical over-the-counter options. That kind of adoption at the studio level matters, because it means the formula has been vetted against exactly the concerns artists raise about stencil adhesion and skin texture.
Every TBNC product is formulated with skin-friendly ingredients, but that approval doesn’t override your artist’s call on the day. The right sequence is always the same: patch test first, confirm with your artist, then apply. TBNC works best as a studio-approved tool inside that process, not a shortcut around it.
Our Take: Comfort Should Never Outrank the Artist’s Craft
We build numbing products, so it would be easy to tell you numbing cream is always the answer. It isn’t. The artists who refuse to use it on realism or fine-line work aren’t being difficult. They’re protecting the thing you’re paying for: a tattoo that heals clean and looks sharp in ten years, not just one that hurt less on the day.
Where we push back on conventional wisdom is the all-or-nothing framing some studios adopt. A well-formulated, properly patch-tested numbing cream, applied and removed correctly, doesn’t have to compromise stencil adhesion. The failures artists describe usually trace back to residue left on the skin or a formula that wasn’t suited to the job, not the concept of numbing itself. Safety and craft aren’t opposites. They just require the same thing: communication with your artist before you ever open the tube.
— The Best Numbing Cream
Which TBNC Products Fit a Neck Tattoo Session?
If your artist gives the green light, TBNC offers numbing and aftercare options that can cover a neck tattoo session from prep to healing. The Ultra Tattoo Numbing Bundle is built for longer, more intense sessions like detailed neck pieces, pairing a deep-numbing formula with aftercare support for when the appointment wraps. If you’d rather start with a single, focused product, The Best Numbing Cream - TBNC - 2 Pack gives you two applications, useful if you want to patch test with one and save the second for appointment day. For readers who want the entire workflow handled in one purchase, from pre-session numbing through healing, the Tattoo Numbing & Aftercare Bundle combines both stages so you’re not piecing together products from different brands.
Whichever option fits your session, the sequence stays the same: patch test days ahead, confirm with your artist, apply per the pre tattoo numbing directions, and remove cleanly before your stencil goes on. For sensitive placements beyond the neck, TBNC’s numbing cream for sensitive and high-pain areas collection is worth a look if you’ve got more work planned.
Sources
The guidance in this article draws on a mix of medical literature and artist-published aftercare resources, including PubMed’s entry on topical anesthetic safety, which outlines the risks of anesthetic use over large skin areas without supervision. Studio and artist perspectives on why numbing cream is often restricted come from Washington Tattoo’s explanation of stencil and ink concerns and a realism artist’s firsthand account of numbing cream’s effect on fine detail work. Preparation and sleep guidance reference Jade & Dagger’s first-time neck tattoo guide and Sortra’s neck tattoo aftercare breakdown.
This article is general information, not a substitute for advice from a qualified doctor. Consult a qualified healthcare professional about your own circumstances before acting on anything here.
- The ultimate guide to getting your first neck tattoo
- PubMed entry on topical anesthetic safety
- Tattoo numbing cream – why we don’t recommend it
FAQ
Are neck tattoos the most painful placement?
Neck tattoos rank among the more painful placements because of thin skin, dense nerve clusters, and proximity to bone, though placement within the neck (throat versus nape versus side) changes the intensity.
How do I prepare for a neck tattoo?
Sleep a full night beforehand, stay hydrated for 24 hours prior, eat a protein-rich meal 1 to 3 hours before your appointment, and avoid alcohol and blood thinners in the days leading up to the session.
How should I sleep after getting a neck tattoo?
Sleep on your side for back-of-neck placements or on your back for front and side placements, use fresh linens, and consider a travel neck pillow to prevent folding and friction against the healing skin.
Why do some tattoo artists not recommend numbing cream?
Many artists avoid it because it can alter skin texture, interfere with stencil adhesion, and cause uneven ink saturation, and because the numbing effect often fades in 60 to 120 minutes, well before longer sessions are finished.
Can I bring my own numbing cream to the studio?
Only if your artist approves it in advance. Bringing pre-applied cream without discussing it first is a common reason stencils fail to stick, so always confirm the product and timing with your artist before your appointment.


